

How To Add A Light Switch To An Existing Box
How to Wire a Light Switch: Easy Steps for Unmarried-Pole and iii-Way Switches
Light switch wiring is a task that near DIYers tin take on themselves without calling an electrician. Follow these steps to wire your switches safely.
istockphoto.com
Although it'southward easy to wire a low-cal switch, y'all need a basic understanding of how electricity works in the home in gild to practise the job safely. If y'all've never earlier worked with wiring, consider hiring an electrician and asking her if you can scout her work and then you lot can learn how to hook up a light switch the right way. One time you've learned how, information technology may take no more 10 minutes to wire a low-cal switch. No specialized tools are required, and the steps are the same whether you are replacing a damaged switch or upgrading to a dimmer.
Earlier You Begin Wiring A Calorie-free Switch
In a residential setting, electric power comes into the home and is distributed via a service panel. This panel is comprised of individual breakers that divert electricity to diverse circuits. All circuits offset at the service panel and carry electricity through cables to switches and outlets and then back to the service panel.
Within the cables are wires designated to do dissimilar jobs: Some supply electricity to the switches while others carry the electricity back to the service panel. Still others human action as safety mechanisms to reduce the risk of electrical shock.
The good news is that you don't need to know avant-garde circuitry in gild to replace a calorie-free switch. You lot only have to disconnect the wires from the existing switch and connect them—in the same fashion—to the new switch. The following bones low-cal switch wiring how-to outlines the steps to wiring a light switch, both for single-pole switches and 3-way switches.
- Single-pole light switch (optional)
- 3-way light switch (optional)
- Screwdriver
- Pliers
- Electric tape (for 3-way switches)
- Multi-tool
Lite Switch Wiring Safety Precautions
When it comes to home wiring, the best rule of thumb is that if y'all don't feel comfy working with electrical wiring, just don't practice it. If you take the correct precautions, replacing a low-cal switch is generally safety and low-risk because yous're manipulating wires that have already been professionally installed. DIYers should not, yet, try running new wiring themselves—that'southward a job for an electrician. The following steps will help you supplant old switches with new ones to update their appearance and part.
How to Wire a Single-Pole Light Switch
Tired of your almond-colored toggle low-cal switches, and want to update them with more modern screwless wall plates and rocker switches? This is a uncomplicated job for a DIYer, given that you lot work advisedly and follow basic condom protocols.
STEP i: Disconnect the ability source.
Information technology is vital to consummate this get-go footstep correctly. Skipping this part or doing it incorrectly could be fatal.
Before you do anything else, ensure that no power is running forth the circuit that you'll be working on. That ways going to the breaker box and switching off the breaker that controls the switch you intend to replace.
To be on the safe side, exam the switch to make sure it no longer turns the calorie-free on. Sometimes breakers are mislabeled, so double-check before moving on to the next step.
STEP 2: Remove the quondam light switch.
In one case you are positive that power has been cut to this item switch, unscrew the switch plate (nearly are secured with two pocket-sized flathead screws), then unscrew the quondam switch from the wall (here, apartment-head and Phillips-head screws are equally common). Carefully pull out the old switch just exit the wires connected for now.
RELATED: Solved! How High to Install a Lite Switch
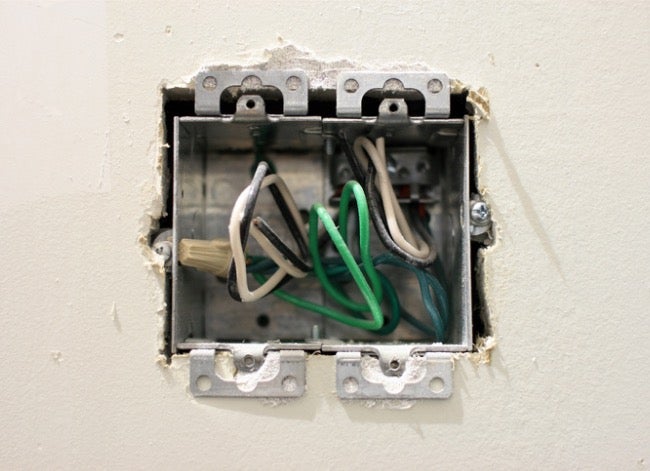
Step three: Identify the terminal and footing wires.
Discover the layout of the wires.
- You should run into 2 black wires, each connecting to a dissimilar screw on the side of the switch. These are chosen terminal screws.
- You lot will too see two white (neutral) wires that connect to one some other in the box. The connexion should be covered with a wire nut.
- You lot should also see iii green or bare copper wires. These are basis wires.
All three wires will connect in a single wire nut, and the shortest i will connect to a dark-green spiral on the light switch.

1. Black wire from source two. Black wire to calorie-free 3. Connected neutral wires 4. Ground wires
STEP iv: Disconnect the terminal and basis wires.
Loosen the screws holding the terminal wires in place. Once done, gratis the terminal wires, using pliers if necessary, to disengage a tight gyre. Likewise, gratis the basis wire. At this point, you should be able to remove the switch from the wall. If it makes your job whatsoever easier, go alee and curve the dangling wires out of the style.
STEP five: Check the wires for any signs of damage.
Examine the ends of the wires for evidence of fraying. Clip off any degraded portions with a multi-tool or wire cutters. Remember to exit most a half-inch of wire exposed on each length.
Considering electric wires experience stress over time and tin can weaken with usage, yous must ensure that when the wires are reattached to the replacement switch, whatever portion of the wire that makes contact with the screws is undamaged.
Step six: Connect the wires to the new switch.
Use a multi-tool or pliers to bend each exposed wire into a round hook. Try to round those hooks tightly enough so they fit snugly around the bend of the screws on the replacement light switch. Knowing how to wire low-cal switch terminals correctly ensures a fully functional switch.
Next, adhere the hooked ends of the wires to the new switch. Start with the blackness wires, connecting them to the final screws on the right side. Their hooks should be oriented in a clockwise position. Go on to attach the green wire, besides called the ground, to the screw on the left. You may find that needle-nose pliers, though not essential, can help proceed the wires in place as yous tighten each screw.
RELATED: How to Splice Wires for Dwelling house Electrical Projects
Stride seven: Reattach and cover the wires with the switch plate.
Protect the switch from fires past wrapping electrical tape around the trunk and the terminal screws. Finally, screw the switch back into the wall, supplant the switch plate, and plow the excursion breaker back on.
STEP viii: Test the light switch wiring.
If you've wired the switch correctly, the light should come on when you flip the switch. If it doesn't, the problem is likely a loose connection.
Turn the billow back off, inspect the wires to see if each is firmly continued to its terminal, and and so remove the wire nut from the neutral (white wires) and check to ensure they're firmly twisted together, so they're making a practiced connectedness. Supercede the cover, turn the billow on, and flip the calorie-free switch again—information technology should come on.
That's it—you're done. Now let the light shine on!
How to Wire a three-Way Light Switch
Sometimes information technology's impractical to take just one switch for a lite, and in these cases, using two 3-manner switches tin can be helpful. For example, two 3-way switches brand information technology possible to turn on a stairway light from either the top of the stairway or from the bottom.
Replacing a 3-way switch is just as straightforward as replacing a unmarried-pole switch, but yous'll detect more wires in the box. Since the ii switches will both control the light, they need extra "traveler" wires connecting the switches to ane another. Read on to find out how to keep the wires direct, how to figure out where they connect to the new switches, and how to wire switches.
RELATED: The Best Motion Sensor Lite Switches of 2021
Pace i: Disconnect the power source.
Locate the breaker that serves the switch. In many homes, a single breaker (in the service panel) will power an unabridged room and so that the breaker may be labeled something like "Master bedroom" or "Upstairs hallway." After flipping the billow off, always exam the switch to ensure the power to it is really off.
Step ii: Remove the switch.
Use a screwdriver to loosen the ii screws that hold the switch plate in identify and set it aside. Then, utilise a screwdriver to loosen the top and bottom screws that hold the actual switch in place. One time the screws are out, yous'll be able to pull the switch out a couple of inches to encounter and work with the wires.
Stride 3: Identify the wires.
2 different types of wire cables are used in a 3-way switch. A standard 14:2 cable that contains a white wire, a black wire, and a ground wire, carries power from the billow to the switch box. A 14:3 cable with a blackness, white, red, and basis wire connects the first switch to the second switch and too to the lite.
The nearly common way (non the but way) to wire a three-way switch is to run the wires from the first switch to the lite so to the second switch. Replacing a 3-way switch in this wiring configuration is covered in the post-obit steps. However, if you open the switch boxes and find a different wire configuration, you can still replace the switches using the general method described here.

i. Two (white) neutral wires 2. Iii basis wires 3. Red traveler wire 4. Black traveler wire 5. Black common wire
Pace iv: Characterization the common wire in the commencement box.
In the showtime switch box (the box where the power comes in), you'll run across viii wires. Two white (neutral wires) will be connected and covered with a wire nut. A black wire will be connected to a black or copper spiral last—this is the "common" wire—and you must distinguish it from the other wires. Put a piece of electrical tape on the common wire earlier disconnecting it, and then you know information technology'south the common wire. Don't skip this step!
You volition also see three footing wires connected within a unmarried wire nut, and you will besides notice an additional black wire and a ruby wire—these are the traveler wires that connect to the calorie-free and to the second switch.
STEP 5: Identify the wires in the second box.
With this wiring configuration, you'll only find 4 wires in the second switch box, a blackness wire, a white wire, a ruby-red wire, and a ground wire. The white wire is not neutral in this switch but rather is used as a hot wire. It should either be labeled with some blackness electrical record or black paint to signify it'south a hot wire. The blackness wire in the box is the common wire, and it runs to the mutual concluding. Go alee and label this common wire as well to help keep it straight.

ane. Common wire 2. Scarlet traveler wire 3. White wire west/ black pigment (hot wire) 4. Footing wire
Pace half-dozen: Disconnect the wires.
Once both common wires are labeled, use a screwdriver to loosen the final screws and remove the wires attached to them. For the wires that are connected to one another and covered by wire nuts, just twist off the nuts to reveal the bare wire ends. Now, you're gear up to install the new switches.
STEP vii: Wire the new switches.
Examine the switches—when installing new 3-way switches, e'er use the identical type for both switches. Terminal configuration tin vary by brand, which tin make installation confusing.
- First, connect the mutual wires to the common terminals labeled on both new switches. If the terminal isn't labeled as "Common," it volition take a black or copper terminal on the bottom side of the switch.
- And so, connect the red wire to a final on the top side of the switch. Scarlet is a traveler wire and tin can exist connected to the left or the right upper final. It doesn't matter as long as you do it the same on both switches. So, if you connect it to the upper right terminal on one switch, connect it to the upper correct last on the other switch.
- Connect the second traveler wire to the terminal opposite the cerise wire terminal. In the first box, this will exist the black wire that you lot did not label as mutual. In the second box, this is a white wire with black pigment or record that indicates information technology's being used every bit a hot wire.
- Connect the white neutral wires in the first box to ane another by twisting them together and securing them with a wire nut.
- Twist the iii ground wires together in the outset box and secure them with a wire nut. So, connect the finish of the shortest ground wire to the greenish terminal on the switch.
- At present, only the ground wire in the second box is left to connect—attach it to the switch'southward brass or greenish terminal spiral.
STEP eight: Replace the covers and test the switches.
In one case the wires are continued, secure the switches using two screws to the switch box and supplant the switch plates. Flip the breaker that supplies power to the switches and test each switch past alternately turning one on and and so the other ane. Either switch will plough the lite on or off, then the switch may be in either the up or downward position to operate the calorie-free.
If the light doesn't come on there could exist a loose connexion. Check to ensure that the wires are firmly attached to their respective terminals and that the white neutral wires in the first switch box are tightly twisted and covered with a wire nut.
RELATED: How to Replace a Low-cal Switch
Final Thoughts
Wiring a switch is a relatively uncomplicated project, as long as yous're replacing existing switches with new ones. However, adding wiring for new switches is a job for a licensed electrician. DIYers should have at to the lowest degree some knowledge and experience with connecting light switch wires, and the focus must e'er be on condom. Never effort to remove a switch until you're sure the power is shut off.
Wiring 3-mode switches may seem more complicated at first but, like single-pole switches, information technology's all well-nigh getting the wires in the same configuration on the new switches as they were on the old switches. Labeling the common wires in 3-way switches simplifies the process.
Homeowners may find different wiring configurations in the switch boxes, which indicates the power source is entering the excursion in another spot—usually through the light. By labeling the mutual wires, and connecting the traveler wires to identical terminals on both switches, nearly any wiring configuration tin can be duplicated.

FAQs Nigh Light Switch Wiring
For those wanting to replace existing switches, either single-pole or three-way with newer switches, wiring is relatively unproblematic. Yet, all electric wiring projects come with a degree of shock and fire risk, so connecting the wires must exist exact. For those considering replacing either type of switch, some questions are to be expected.
Q: What happens if you wire a switch backwards?
If yous wire a single-pole switch incorrect, the light won't come on at all. If y'all wire a 3-way switch wrong, you may be able to turn the light on from one switch, but not the other. It'southward of import to review how to wire a switch before attempting this project.
Q: Tin wiring a calorie-free switch wrong cause a burn?
Yes. Loose wires can overheat and arc, which can crusade a fire. If yous have any doubts nearly your DIY wiring capabilities, inquire an electrician to exercise the wiring.
Q: How do you wire a 3-way calorie-free switch?
Replacing an existing 3-mode switch with a new model is a straightforward chore, and you lot'll need to mimic the wiring configuration on the current switch when connecting the wires to the new switch. Come across higher up for complete steps.
Q: Can I wire an outlet from a light switch?
It may be possible if the box is big enough (20 cubic inches) and contains ii neutral wires. Withal, this is a chore for a licensed electrician because it involves knowing how much electrical load is already on the excursion and whether information technology's adequate for adding an outlet.

How To Add A Light Switch To An Existing Box,
Source: https://www.bobvila.com/articles/how-to-wire-a-light-switch/
Posted by: newmanmunly1988.blogspot.com
0 Response to "How To Add A Light Switch To An Existing Box"
Post a Comment